You can create MS Dynamics CRM environment by providing the necessary connection parameters.
Before creating a MS Dynamics CRM environment, you should take a note of the following:
- Prerequisites
- JDBC driver details
- TLS connection details
- JDBC connection parameters
Prerequisites
Prerequisite steps for establishing successful connection:
- Creation of dedicated service account for erwin with Metadata read-only privileges in MS Dynamics CRM database
- CRM Server IP Address should be mapped with Host Names in the file called “Hosts” which is available in the location - C:\Windows\System32\drivers\etc
- Generate CRM Domain trusted Certificate in erwin application server using InstallCert.java and place the generated “jssecacerts” file in the location - C:\Program Files\AdoptOpenJDK\jdk-XXX\jre\lib\security
JDBC Driver Details
The MS Dynamics CRM JDBC driver is not packaged with erwin DI application. Hence, customers needs to use the jdbc driver available at their end for MS Dynamics CRM (CDATA, Progress etc.)
You can download CDATA driver from the URL mentioned below.
Download URL: https://www.cdata.com/drivers/dynamicscrm/download/
Location to configure the JDBC driver: Once downloaded, the MS Dynamics CRM drivers should be placed in the following path in erwin application server: \Apache Software Foundation\<Tomcat X.X>\webapps\erwinDISuite\WEB-INF\lib and restart the Tomcat.
TLS Connection Details
The CDATA MS Dynamics CRM driver uses SSL by default, so you will not need to set any additional properties. The connection will use TLS 1.2 encryption.
JDBC Connection Parameters
The Connection Properties tab displays the connection parameters to establish connection for MS Dynamics CRM connection.
Once the connection parameters are entered, use these options ![]() to go to the next tab, test the connections, save and continue, or save and exit.
to go to the next tab, test the connections, save and continue, or save and exit.
To enter MS Dynamics CRM connection parameters, follow these steps:
- Select Database Type as Other while creating the environment.
- Enter appropriate values in the fields (connection parameters). The fields marked with a red asterisk are mandatory.
Field Name
Description
Driver Name
Specifies the JDBC driver name for connecting to the database.
For example, cdata.jdbc.dynamicscrm.DynamicsCRMDriver
IP Address/Host Name
Enter the IP Address or Host Names of MS Dynamics CRM server.
For example, 10.45.21.123
DBMS Name/DSN
Enter the MS Dynamics CRM Database Name.
For example, CRM.
Port
Specifies the port to connect with the database.
443 is the default port for MS Dynamics CRM. You can change it, if required.
User Name
Enter the MS Dynamics CRM (Service account) user name.
For example, domain\erwinuser.
URL
Specifies the full JDBC URL that is used to establish a connection with the database.
It is autopopulated based on the other parameters.
For example, jdbc:dynamicscrm:User=UserName;Password=XXX;URL=<MS Dynamics CRM URL>;
If user trying to connect CRM online version, then append the following value to above mentioned connection string CRM Version=CRM Online;
Password
Enter the MS Dynamics CRM (Service account) password.
For example, goerwin@1.
Save Password
Specifies whether the password is saved
DBMS Instance Schema Specifies the schema of the database.
For example, DynamicsCRM.
Connection Pool Type
Specifies the connection pool type being used to connect via JDBC.
For example, HIKARICP and BONECP.
Number of Partitions
Specifies the number of partitions of the database.
It is autopopulated with default number of partitions. You can edit and provide the number of partitions as required. For example, 1.
Minimum Connections Per Partitions
Specifies the minimum connections per partitions of the database.
It is autopopulated with default minimum connections per partitions. You can edit and provide the minimum connections per partitions as required. For example, 3.
Maximum Connections Per Partitions
Specifies the maximum connections per partitions of the database.
It is autopopulated with default maximum connections per partitions. You can edit and provide the maximum connections per partitions as required. For example, 5.
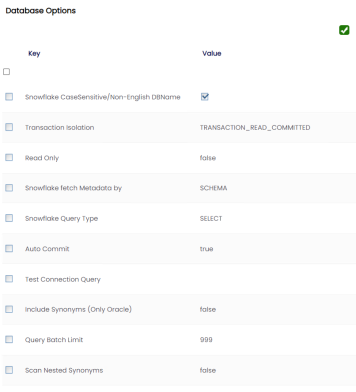
To use database options, click
 (Options).
The Database Options page appears displaying the different options available.

Select keys and double-click the cells under the Value column to set the values of the keys. Use
 to save the database options.
|
Copyright © 2024 Quest Software Inc. |